Redesigned autofilter popup

I’m happy to announce that I’ve managed to squeeze this new feature in just in time for the 3.5 code freeze.

What’s new?

As I’ve mentioned briefly in G+, I’ve been working on brushing up the age-old autofilter popup window in the past few weeks. I have no idea how old the old one is, but it’s been there for as long as I remember. In case anyone needs a reminder as to what the old one looks like, here it is.
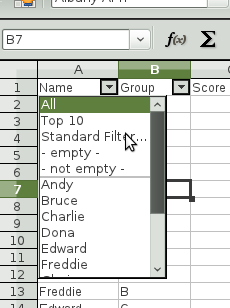
It’s functional, yet very basic. While this has served us for many years since the last century, it was also clear that the world has since moved on, and the people has started craving for modern looks and eye candies even in the office productivity applications. Clearly, it was time for a change.

In contrast to the old, here is how the new one looks:
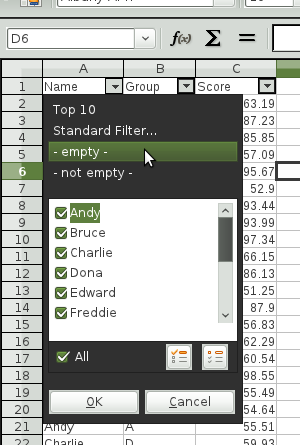
I don’t know about you, but I really like the new one better. :-)

Motivation

Aside from updating the aged look of the old popup, I was also motivated to introduce the new popup for its ability to allow selection of multiple values from the selection list.

As you can see in the screenshot, the old one allowed only one value to be selected for each given column, which was not only very limiting but also caused interoperability issues with Excel documents, especially with those created in Excel 2007 and newer. In fact, adding this feature has been my long-term goal, ever since I began working on OpenOffice.org code base professionally. Because of this background, I had my personal attachment to fulfill that goal, and I’m really glad to have finally landed this feature 4 years and one name change (OOo to LibreOffice) later!

Laying the foundation

You may think that this new popup looks somewhat familiar. That’s because the same popup is also used as the pivot table (formerly data pilot) field member selection popup. I’ve touched on this previously on my blog, and you’ll probably notice the similarity when comparing the screenshot of the new popup with the screenshot of the pivot table popup included in that post.

Internally these two use the same code. In fact, when I developed that feature for the pivot table, I intentionally designed it to be re-usable, precisely so that I could use it for the autofilter popup at a later time.

So, the hard part of implementing the new popup had already been finished. All I had to do was to put the autofilter functionality into the popup and launch it instead of the ugly old one, which is precisely what I did to bring the new popup into reality. I also had to refactor the code that performs the filtering to allow multi-value matching, which was, while invisible to the users, not a trivial task.

Going forward

The work is not totally done yet. As of this writing, the xlsx filter has not been fully adopted to take advantage of the new multi-selection capability, but that’s my next task, and I expect that to be done in time for 3.5.

Also, the menu still looks very basic, and contains only the same set of options that the old popup had. This was done deliberately in order for us to ship it in time for 3.5, by avoiding the rather expensive process of re-designing the menu part of the popup. But I expect we work on the re-design post-3.5, to make it even better and more usable. Note that the new popup is fully capable of doing sub menus, which gives us all sorts of possibilities.

Anyhow, that’s all I have to say about this at the moment. I hope you guys will enjoy the new and shiny autofilter popup! :-)

Notes for testing

As with any new features, this one needs lots of testing. I’ve written new unit test to cover some parts of it, but unit test can’t cover all corners of use cases (especially those involving UI interactions), and manual testing from real users is always appreciated. Some of the affected areas I can think of are:

  • Built-in functions MATCH, LOOKUP, HLOOKUP and VLOOKUP that use the core filtering code which I’ve heavily refactored.
  • Import and export of the existing filtering rules, with ods, xls, and xlsx.
  • Filtering with pivot tables, which shares parts of the filtering code that has been refactored.
  • Standard and advanced filter dialogs

So, watch out for the next daily build that includes this feature!
New option to specify initial number of sheets

This just landed on the master branch.

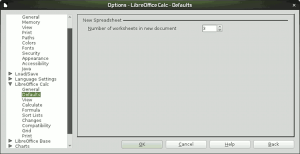
Starting with LibreOffice 3.5, you can now specify the initial number of sheets that new documents will have. Previously, this was hard-coded to be 3 sheets in all cases no matter what. While this didn’t seem to bother a whole lot of people based on how little bug reports we’d received on this, it did bother some users enough so that one of them have decided to code up a patch to make it happen. Now, without further ado, let’s take a look at the new option page:

new-doc-options

where you can change the number of worksheets in new document, which becomes effective the next time you create a new document.

Last but not least, the name of the person who made this all happen is Albert Thuswaldner. Please give kudos to him for his excellent work. :-)

New document status image in the status bar

I’ve just checked in the new icon set for the document status indicator from Paulo José. Here is a side-by-side screenshot of what the new icons look like.

statusbar-new-status-icon

The above is what it looks like when the document is unmodified. It’s a bit faded with translucency effect which is intentional. The one below is when the document is modified. The new images look very refined and are more in line with the application icon that we use for LibreOffice. Good work Paulo! :-)

Now, he has created another icon to show immediately after the document is saved, before it becomes the faded icon again after a few seconds. But that effect has yet to be implemented. If you are interested in taking on this task, drop us a note. It’s listed on the Easy Hacks page.

And let’s not forget to say that 3.4 will have these two brand-new icons.

Named range as data source in DataPilot table

I have hinted in my previous post that you can now use a named range as the data source of a DataPilot table, but you couldn’t create a new DataPilot table with a named range as the source.

Well, now you can.

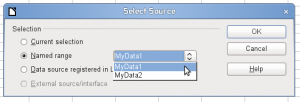
I tried to come up with a clever way to add this functionality, but ended up with just another radio button in the existing source selection dialog (the dialog that pops up when you select Data – DataPilot – Start without an existing DataPilot table).

Here is a screenshot of the new dialog as evidence:
calc-dp-named-range-source

This functionality is currently available on the master branch of LibreOffice. For those of you who can build LibreOffice directly from the repository, go check it out!

For those of you who would rather wait for a released version, this will be available in 3.4 – the next minor release. Refer to this page for more detailed release plan of the upcoming versions of LibreOffice.

FOSDEM 2011 slide & latest updates

I’ve just uploaded the slide for my talk during FOSDEM 2011 here. It was very nice to be able to talk about our somewhat ambitious plan to bring LibreOffice Calc to the next level. Also, I regret that I haven’t been able to blog about what’s been going on lately; lots of time spent on writing, reviewing code, fixing bugs and integrating patches, and sadly little time is left on writing blogs.

Having said all that, let me talk about a few things that are new on the master branch (since I’m already in the writing mode).

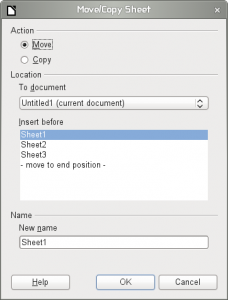
The first one is the new move/copy sheet dialog

new-copy-move-sheet-dialog

which is based on the design suggestion from Christoph Noak and coded by Joost Eekhoorn. The idea is to provide a quick way to rename a copied sheet, and also to make the layout more ergonomic and more appropriate to modern HIG. There are still some minor issues that we have yet to work out, but this is a step in the right direction.

The second one is related to DataPilot. In fact there are two new enhancements landed on master with regard to DataPilot.

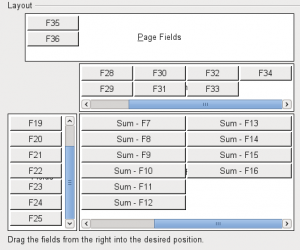
The first enhancement is the support for unlimited number of fields. Previously, DataPilot could only support up to 8 fields in each dimension (page, column, row and data). But now you can define as many fields in each dimension as you desire, provided that you have enough memory and CPU cycles to handle extra load.

calc-dp-unlimited-fields

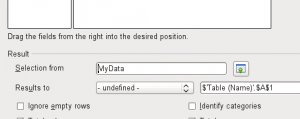
The second DataPilot enhancement is the support for named range as the data source. Now, you can use a named range as the data source of a DataPilot table, instead of raw range reference. This has the advantage that, when your source range grows, you can simply update the named range and refresh the DataPilot table.

calc-dp-named-range-source

However, I have not yet added a way to create a new DataPilot table with a named range as data source. I will work on that sometime soon, hopefully in time for our 3.4 release.

Other than that, I’ve fixed quite a number of bugs and added performance enhancements particularly with regard to external reference handling. Still, there are lots of other tasks I need to do on master before we hit the 3.4 release. Stay tuned for more updates.

Key binding compatibility options (take 2)

This post is a sequel to this previous post, so refer to that post for the detail of what I’ve been working on.

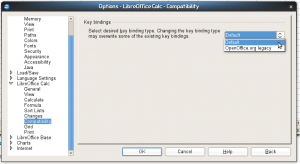
Anyway, I have settled with the following Compatibility option page:

calc-compat-option

which should be just adequate for what it needs to do without being too annoying.

Also, just for the matter of documenting its behavior, the following chart shows what actions are associated with what key bindings for the two key binding types (Default and OpenOffice.org legacy):

Key Binding Default OpenOffice.org legacy
Backspace delete contents delete
Delete delete delete contents
Ctrl-D fill down data select
Shift-Ctrl-D data select

where the actions are

  • delete contents – launch the delete contents dialog.
  • delete – immediately delete the cell content, without the dialog.
  • fill down – fill cell content downward within selection.
  • data select – launch the selection list dialog.

Note that all the other key bindings are left untouched. Also, the list of key bindings that can get reset by this functionality may grow in future releases.

Key binding compatibility options

As I posted on the libreoffice development list, I’m currently working on adding a new option page in the Options dialog, to provide a quick way to switch key bindings between LibreOffice’s default and OpenOffice.org’s for Calc. For the most part, the default key bindings are identical between LibreOffice and OpenOffice.org as far as Calc’s concerned, but there are some differences, which are enough to annoy those users who are accustomed to the old key bindings from OOo Calc.

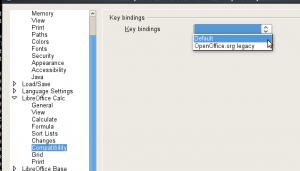
The option page will look something like this:
calc-key-binding-compat

but it will not look exactly like this since this is just my first viewable version with no design effort put into it at all. So, hopefully we can morph this into something a little more usable and a little more bearable.

Right now, we only deal with key binding compatibility; however, we may expand this page to incorporate other compatibility options in future versions of LibreOffice.

Stay tuned!

Inserting current date and time in one step

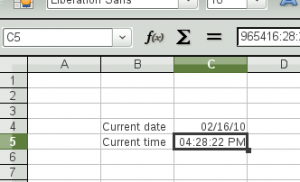
current-date-time
Here is another simple feature that may come in handy.

With the change I just checked into ooo-build master, you can now insert current date and time with just one key stroke. By default, Ctrl+; (semicolon) is bound to current date, while Ctrl+Shift+; is bound to current time. But these key bindings are configurable in case you don’t like these default bindings.

Two more enhancements are in

Today, I’d like to talk about two minor enhancements I just checked in to ooo-build master. They are not really earth-shuttering per se, but still worth mentioning & may be interesting to some users.

Insert new sheet tab

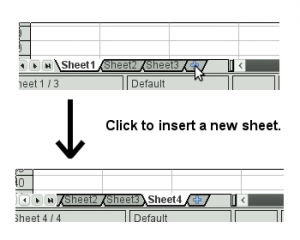
insert-sheet-shot

Here is the first enhancement. In Calc, you’ll see a new tab at the right end of the sheet tabs, to allow quick insertion of new sheets. Each time you click this tab, a new sheet gets inserted to the right end. The sheet names are automatically assigned.

Previously, inserting a new sheet has to be done by opening the Insert sheet dialog, selecting the position of the new sheet and how many new sheets are to be inserted etc. But if you always append a single sheet at the right end and don’t care to name the new sheet (or name it after the sheet is inserted), this enhancement will save you a few clicks. Implementing this was actually not that hard since I was able to re-use the existing code for most of its functionality. I personally wanted to give it a little more visual appeal, but that will be a future project.

Anyway, I hope some of you will find this useful.

English function names in non-English locale

The second enhancement is related to cell functions. If you use a localized version of OOo, you probably know that the function names are localized. But there has been quite a few requests to support English function names even if the UI is localized. This is where this enhancement comes in.

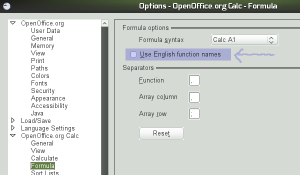
First, there is now an additional check box in the Formula options page:
english-func-option
By default, the check box is off, which means the localized function names are used. Checking this check box will swap localized function names with the English ones across the board. You can of course uncheck it to go back to the localized function names.

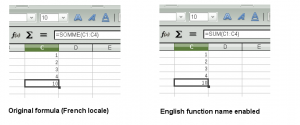
For example, in French locale, the name of the function that calculates a summation of a cell range is called SOMME, but when the English function name option is enabled, this becomes SUM as you can see in the following screenshot:
english-func-displayed

This change takes effect in all of the following areas:

  • formula input and display,
  • function wizard, and
  • formula tips.

As always, please test this thoroughly, and report any bugs. Thanks!

Distributed text justification

What’s new?

Here is something I’ve been working on for the past few weeks. Since I just checked in the first version of this feature into ooo-build master, it’s probably a good time for me to talk about this.

This feature introduces a new justification option for cell text known as the “distributed justification”, where the left and right edges of the text are aligned with the left and right edges of the bounding box by adjusting space between characters (inter-character spacing), rather than space between words (inter-word spacing), across the entire width of the bounding box. This type of distributed text justification makes little sense for Latin-based languages such as English, French and German, but makes a big difference for Asian languages such as Japanese. The reason the normal justification doesn’t work for Asian languages is because, in those languages, you don’t put spaces between individual word boundaries, and the normal justification relies on presence of spaces at word boundaries. This is where the distributed justification comes into play.

This distributed justification method is commonly known as ?????? in Japanese, and is said to be one of the blockers when attempting to migrate users away from Excel to Calc.

Horizontal justification

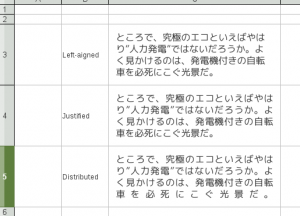
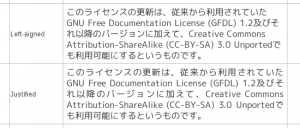
First and foremost, I’d like to cover the horizontal justification. The following screenshot shows the difference between the three horizontal alignment modes:

calc-text-hor-align

As you can see, in the normal left-aligned text, the right edges of the lines are not aligned. When the text is justified, the right edges of the lines are now aligned by adjusting the inter-character spacing, except for the last line, which remains left-aligned. When the text is distributed, even the right edge of the last line becomes aligned with the right edge of the bounding box by equally distributing the characters on that line.

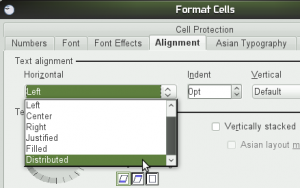
To allow this new justification type, I added a new justification type Distributed to the existing Cell Formatting dialog.

calc-text-align-dlg

For the vertical alignment setting, I’ve added two new options Justified and Distributed, to support justification in the vertical direction.

Justifying Asian text mixed with Latin text

While working on this feature, I have decided to also tweak the normal justification algorithm to make it work slightly better for Asian text mixed with Latin text such as English. As I mentioned earlier, distributed justification is not really ideal for Latin text. But with the society becoming more and more global, we are seeing more and more Asian text intermixed with Latin text, and vise versa. And correctly justifying a text having mixed script types requires using different justification methods for their respective script types. After a bit of trial and error, I think I got it right. You can see the result in the following screenshot:

mixed-script-justification

The English portion of the text is justified by inter-word justification, whereas the Japanese portion is justified by inter-character justification. The spaces between the English and Japanese text portions are also slightly adjusted in this scheme.

Vertical justification

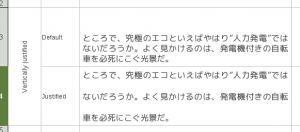
Now, let’s move on to the vertical justification. When you justify a text in the vertical direction, that is, in the direction perpendicular to the direction of text flow, the spacing between the lines gets adjusted so that the top and bottom lines get aligned with their respective edges of the bounding box, like so:
vertically-justified
The top cell shows text with default justification, while the bottom cell shows text with vertical justification.

The Cell Format dialog itself provides both Justified and Distributed options for the vertical justification setting, but they do exactly the same thing for horizontally-flowing text. For vertically-flowing text, on the other hand, they do different things, but more on that in the next section.

Justifying vertically flowing text

Now, you can also justify text even when the text is flowing vertically. There are three ways you can make the text flow vertically. You can either

  1. rotate 90 degrees to the right (bottom-to-top),
  2. rotate 90 degrees to the left (top-to-bottom), or
  3. switch to Asian layout mode, which flows text in the top-to-bottom, right-to-left direction.

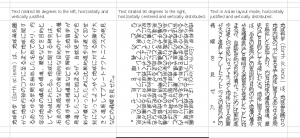
In these modes, the Justified and Distributed vertical justification options do have different effects. The following screenshot demonstrates different vertical alignment settings in three different vertical flow modes.

vertially-flowing-paragraph

As an added bonus…

The code responsible for the text layout, the code where I made my modification to support this feature, is actually shared between Calc, Draw and Impress. Calc uses it to render complex cell text, while Draw and Impress use it for their text box objects. This means that, any improvement I make in this area will automatically be made available for all three applications. All that needs to be done is to simply adjust the UI in each app and add hooks in their respective import/export filters. Whether or not I’ll work on that during this cycle is another question. Having said that, I’d like to eventually get that done, and I’d like to do it sooner rather than later. But we’ll see how that goes.

But even without making the extra code change in the Draw/Impress code, my change so far was enough to fix this bug which I didn’t even know existed. :-)

Lastly…

As of this writing, I’m not entirely done with this feature yet. I still have to cover some corner cases, and I still need to fix some bugs which I unfortunately discovered while taking screenshots for this post. So, stay tuned for further fine-tuning!