Speedier export of rich text cells

Here is another performance improvement that just landed on master.

Background

It was brought to our attention that the performance of saving documents to ODF spreadsheet format had been degrading quite noticeably. This was especially true when the document contained lots of what we call rich text cells. Rich text cells are those cells that contain text with mixed format spans, or text that consists of multiple lines. These cells are handled differently from simple strings internally, and have slightly more overhead than the simple string counterparts. Because of this, saving a document full of such texts was always slower than saving one with just numbers and simple strings.

However, even with this unavoidable overhead, the performance of saving rich text cells was clearly going in the wrong direction. Therefore it was time to act.

Long story short, after many days of code reading and writing, I brought it to a state where I can share some numbers.

Measuring export performance

I measured the performance of exporting rich text cells in the following steps.

  1. Create a new spreadsheet document.
  2. Type in cell A1 3 lines of ‘libreoffice’. Here, you can hit Ctrl-Enter to move to the next line within the same cell.
  3. Copy A1, select A1:N1000 and paste, to replicate the content of A1 to all cells in the range.
  4. Save the document as ODF spreadsheet document, and measure its duration.

Results

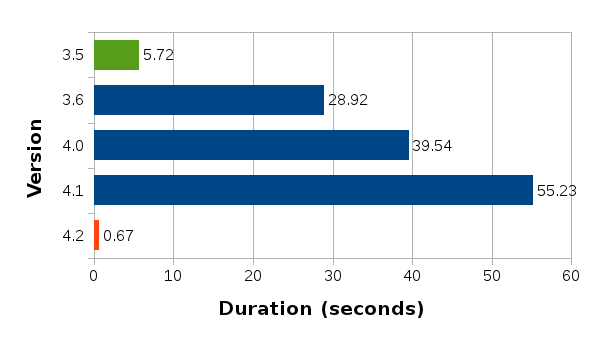
I performed the above measurement with 3.5, 3.6, 4.0, 4.1, and the latest master (slated to become 4.2) builds, and these are the numbers.
edit-text-export-ods-perf

It is clear from this chart that the performance started to suffer first in version 3.6, then gradually worsened over 4.0 and 4.1. The good news is that we have managed to bring the number back down in the master build, even lower than that of 3.5 which I used as the point of reference. Not just slightly lower, but much, much lower.

I don’t know about you, but I’m quite happy with this result.

Orcus integration into LibreOffice

Last week was SUSE Hack Week, where we SUSE engineers were encouraged to be creative and work on whatever project that we had been dying to work on.

Given this opportunity, I decided to try integrating my orcus library project into LibreOffice proper to see how much improvement we could make in the performance of loading spreadsheet documents.

I’ll leave the detailed description and goal of orcus project for another blog post, but in short, orcus is an independent library designed to process spreadsheet documents, and is also designed to be useable from an application that would like to use it to load documents. It’s currently still work in progress, and is not even in alpha quality. So, I intentionally don’t release orcus library packages on an official basis.

Integration work

The main difficulty with integrating orcus into LibreOffice proper was dealing with the very intricate loading process that LibreOffice uses for all existing filters. It first goes through an elaborate type detection process, which loads the content of the file into memory in order for the type detection code to parse it. Once the correct type is determined, LibreOffice then instantiates correct frame loader and start the actual loading process. I’ve explained all of this in detail in this blog post of mine.

Orcus, on the other hand, only needs a file path, and it does the rest. And it pushes data to the call back functions provided by the client code as it parses the file. It was this difference in overall loading process that made the integration of orcus into LibreOffice all the more challenging. And even though the hack week itself lasted only one week, I had spent months prior to it just to study the type detection code and other auxiliary code that makes up the whole file loading process in order to come up with an elegant way to add hook for orcus.

Long story short, I was able to come up with a way to hook orcus such that LibreOffice relinquishes all its file loading to the orcus library, and only handles callbacks. To make this work, I first packaged orcus into an installable rpm package using the openSUSE build service, locally installed that package, then added –with-system-orcus configure option to allow LibreOffice to find the library. The entire change needed to add hook is condensed into this commit.

Using CSV filter as an experiment

As an initial experiment, I replaced the current csv import filter with one from orcus, just to see how this overall process works. The results are very encouraging.

With a very large csv file I created via this python script:

#!/usr/bin/env python
 
import sys
 
for i in xrange(0, 65536):
    for j in xrange(1, 101):
        val = i * 1.0 / j
        sys.stdout.write("%g,"%val)
    sys.stdout.write("end\n")

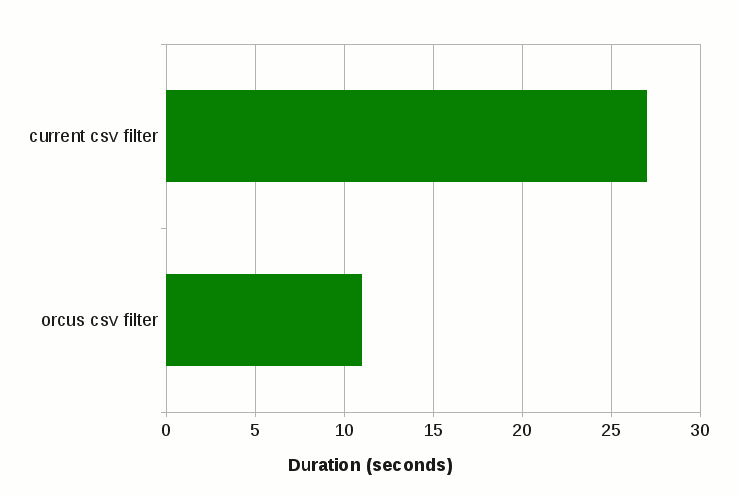
the current filter spends roughly 27 seconds to load this file, which is not too bad given the sheer size of the file (~50Mb). The orcus filter, on the other hand, spends only 11 seconds to load the same file.

However, the orcus filter code path still skips a number of steps that need to be performed if it were to be used in the production build, such as

  • drawing progress bar in the status bar area,
  • calculating row heights for rows that include multi-line cell contents, and
  • probably something else I forget to mention here.

Given some of these can be quite expensive, the above numbers may not be fully comparable. Despite that, these initial numbers show a great promise on the performance improvement that may result from using the orcus library.

Future work

First of all, we will not switch to the orcus csv filter anytime soon. Although I’d like to see that happen at some point in the future, there are still lots of missing pieces in the orcus csv filter that prevent us from using it in the production build. My plan with orcus is therefore limited to addition of new filters, and my immediate plan is to develop new XML import and export filters using orcus, and integrate it into LibreOffice. This should also provide a stepping stone for any additional filters that may come up later, as well as replacing some of the existing filters as the need arises.

That’s all for now. Thanks for reading!

What goes on when loading a file.

I just had an opportunity to spend some time reading and analyzing what actually takes place when you do a mundane thing like opening a file. If you are a user, you wouldn’t think much when opening a new document. You select the file, click Open, and you expect that file to be open. If you are a coder, however, and especially if you are a coder who has spent some time either looking through or trying to debug this code, I bet that this is one of the most horrifying places to work in even in this code base. It certainly is for me.

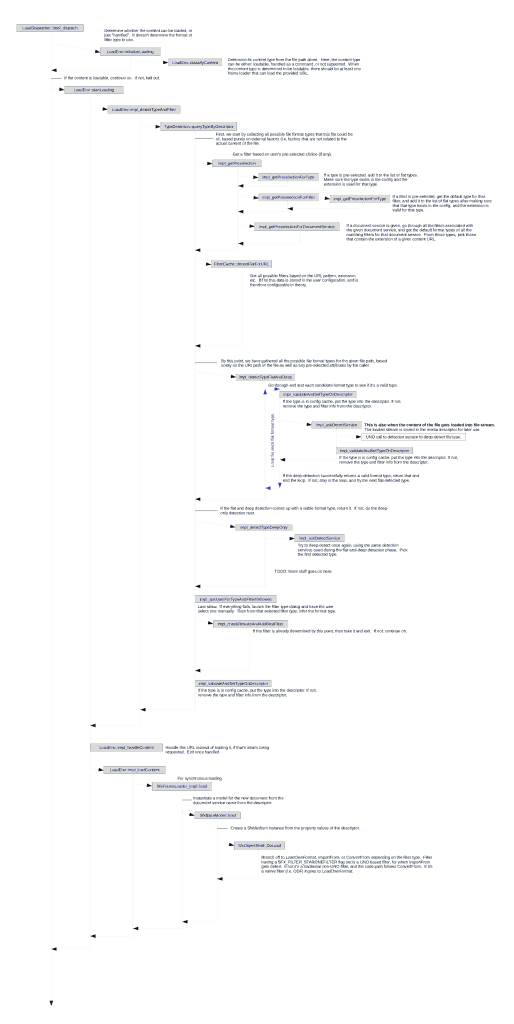
Anyway, since I’m a diagram-oriented person, I’ve decided to sketch a very rough diagram of what happens when you open a file, from the moment we receive a dispatch request with the URL of the document, to the point where we pass that call to the appropriate filter code. Here is the result.

file-load-process-diagram

Now, this is a cleaned-up version. The actual code contains lots more branch points and quite a few “temporary” hacks (here the term “temporary” is used very loosely), which undoubtedly will confuse you even more. But I believe this diagram illustrates a very rough overview of how we determine the format type of the document, how the “right” (“right” in 95% of the time) filter gets picked, and where to look in case something doesn’t work as expected…. Hopefully.

mso-dumper now packaged in OBS

I’m happy to announce that the mso-dumper tool is now packaged in the openSUSE build service under my home repository. This tool is written in Python, and allows you to dump the contents of MS Office documents stored in the BIFF-structured binary file format in a more human readable fashion. It is an indispensable tool when dealing with importing from and/or exporting to the Office documents. Right now, only Excel and Power Point formats are supported.

This package provides two new commands xls-dump and ppt-dump. If you wish to dump the content of an Excel document, all you have to do is

xls-dump ./path/to/mydoc.xls

and it dumps its content to standard output. What the output looks like depends on what’s stored with the document, but it will look something like this:

...
0085h: =============================================================
0085h: BOUNDSHEET - Sheet Information (0085h)
0085h:   size = 14
0085h: -------------------------------------------------------------
0085h: B4 09 00 00 00 00 06 00 53 68 65 65 74 31 
0085h: -------------------------------------------------------------
0085h: BOF position in this stream: 2484
0085h: sheet name: Sheet1
0085h: hidden state: visible
0085h: sheet type: worksheet or dialog sheet

008Ch: =============================================================
008Ch: COUNTRY - Default Country and WIN.INI Country (008Ch)
008Ch:   size = 4
008Ch: -------------------------------------------------------------
008Ch: 01 00 01 00 

00EBh: =============================================================
00EBh: MSODRAWINGGROUP - Microsoft Office Drawing Group (00EBh)
00EBh:   size = 90
00EBh: -------------------------------------------------------------
00EBh: 0F 00 00 F0 52 00 00 00 00 00 06 F0 18 00 00 00 
00EBh: 02 04 00 00 02 00 00 00 02 00 00 00 01 00 00 00 
00EBh: 01 00 00 00 02 00 00 00 33 00 0B F0 12 00 00 00 
00EBh: BF 00 08 00 08 00 81 01 09 00 00 08 C0 01 40 00 
00EBh: 00 08 40 00 1E F1 10 00 00 00 0D 00 00 08 0C 00 
00EBh: 00 08 17 00 00 08 F7 00 00 10 

00FCh: =============================================================
00FCh: SST - Shared String Table (00FCh)
00FCh:   size = 8
00FCh: -------------------------------------------------------------
00FCh: 00 00 00 00 00 00 00 00 
00FCh: -------------------------------------------------------------
00FCh: total number of references: 0
00FCh: total number of unique strings: 0
...

I have originally written this tool to deal with the Excel import and export part of Calc’s development, and continue to develop it further. Thorsten Behrens has later joined forces and added support for the Power Point format. Right now, I’m working on adding an XML output format option to make it easier to compare outputs, which is important for regression testing.

DBF import performance

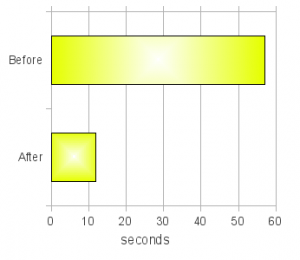
dbf-import-perfHere is another performance win! Importing dbf files into Calc is now quicker by 80%. You will probably notice the difference especially when importing a large dbf file. The test document I used had roughly 24000 rows, and importing that took 57 seconds on my machine. Having 24000 rows in a database file (or even in a spreadsheet file) is very common by today’s standard, so this wasn’t good at all.

I had done quite a bit of performance work over the years, but this one was somewhat difficult to tackle. The bottlenecks were fragmented all over the place which required different solutions to different areas. Roughly speaking, the following are the areas I tackled to reduce the total import time for dbf files (module name in parentheses):

  • speedup in parsing of dbf file content (connectivity)
  • disabled property change notification during dbf import (dbaccess)
  • more efficient string interning and unicode conversion (sal)
  • reduction in column array re-allocation during import (sc)
  • removal of unnecessary column and row size adjustments post-import (sc)

With all of this, the file that originally took 57 seconds to load now loads in 12 seconds on the same hardware, which roughly translates to 80% reduction of the total import time!

This itself is pretty impressive; however, I was hoping to get it at least under 10 seconds since Excel can load the same file less than 5 seconds on the same hardware, even through wine emulation (!). But that’s probably for a future project. For now, I’m content with what I’ve done.

CSV import enhancement

As I mentioned in my previous post, I had introduced two new HTML import options to control how numbers in cells are detected & converted during import. I had also hinted at the end of the post that I might add the same import options to the CSV import dialog. I’m writing this post to inform you guys that that’s exactly what I just did.

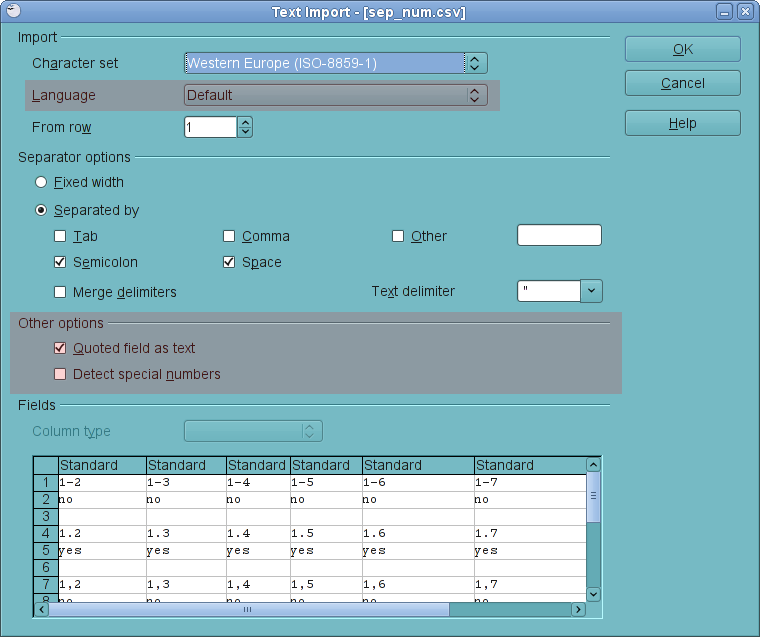
Here is the new CSV import options dialog:

which highlights the changes I’ve made. At the top of the dialog is the new Language list box, to select what language to use for the import. If it’s set to Default, it uses the language that OOo uses globally. Similar to the HTML import, this option affects how the numbers are parsed, based on the decimal and thousands separators for the selected language, as well as how the special numbers are detected & converted. I’ll talk more on the special number detection later.

In addition to the language option, located in the middle of the dialog are two check boxes to further control how cell values are to be interpreted.

  • Option Quoted field as text, when set, always imports quoted cell values as text, even if they are numbers. This option existed before this change, but was used only for the separator-based CSV imports. It is now used for the fixed width imports as well.
  • Option Detect special numbers, similar to the one in the HTML import option, controls whether or not to detect specially-formatted numbers, such as dates, scientific notations etc. When this option is set, Calc will try to detect special numbers and convert them into appropriate format. When this option is not set, Calc will only convert the simple decimal numbers. By default, this option is not set.

Anyway, that’s all there is to it. Hopefully this will solve, or at least make it easier to handle importing of CSV documents, which was previously hampered by Calc’s aggressive date detection and lack of support for alternative number separators. I doubt that this will make your CSV import experience a perfect one, but it will hopefully make it a much better one.

HTML import option

What’s new?

I just checked in to the Go-OO master branch an enhancement to Calc’s HTML table import feature. With this enhancement, you can select a custom language to use when you import an HTML table, which affects how the numbers are interpreted during the import.

What’s this good for?

Each language adheres to a different set of conventions, such as date formats, thousands and decimal separators, and other special number formats. Previously, Calc simply used the system’s language setting when importing an HTML in order to decide whether a cell is a nubmer or a text, and if it’s a number, what numbering format to apply. Although you could change the system language in the global options dialog, that was not always convenient especially when all you need to do is quickly import an HTML table with different language conventions, and you don’t want to bother changing the global language setting (and changing it back after the import is done). That’s where this enhancement will come in.

What can you expect with this change?

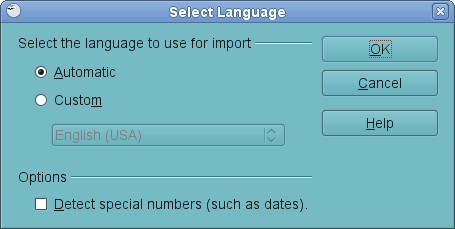
Well, you’ll get the following dialog

when you are importing an HTML table, to either select the system’s language (Automatic), or a custom language from the list of available languages. Just remember that, if you don’t know or don’t care about what language to choose, select Automatic and move on. If you do care, then select Custom and pick a language from the list.

Special number detection (especially the dates)

There is an additional option below, to toggle automatic number format detection. With this option checked, Calc will try to automatically detect special number formats, such as dates, scientific notations etc. If unchecked, Calc will only detect the simplest numbers i.e. numbers that only consist of digits, decimal separators and thousands separators (and a sign if there is one), while all the other numbers are imported as text. By default, this option is NOT checked, which means Calc will only detect the simple numbers.

BTW, I’m thinking of adding a similar option to the csv import, where automatic date conversion has been quite problematic in the past and driving lots of users crazy. Adding this option also to the csv import would IMO make sense.

Well, this is it. It’s actually a pretty minor enhancement, but I hope someone will find it useful. :-)

It’s text when it’s quoted, stupid!

Ok. This is another one I just checked into ooo-build trunk. It’s actually a very minor enhancement, but some people may find this useful.

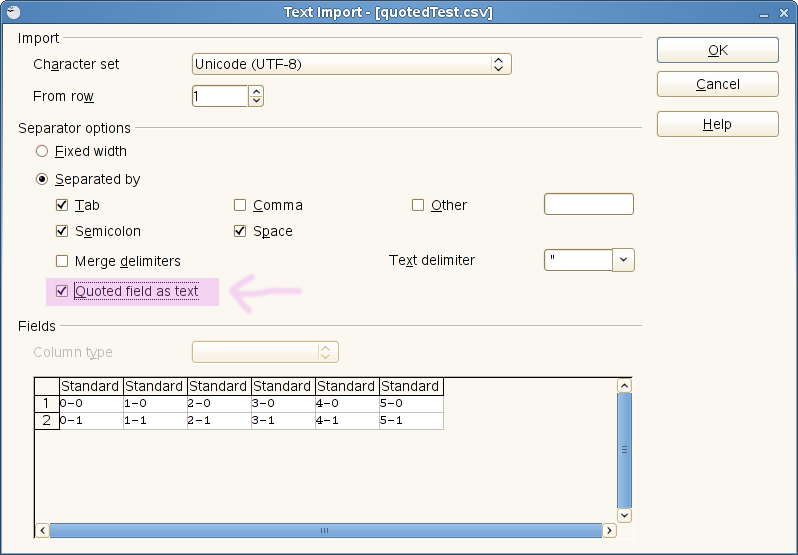
What I did is to modify Calc’s csv import filter to provide the users an option to always import quoted fields (or cells) as text. Here is a screenshot of the dialog with this new option:

Hopefully what it does is self-evident. If not, here is an example.

Let’s say you have a csv file of the following content:

"0-0" "1-0" "2-0" "3-0" "4-0" "5-0"
"0-1" "1-1" "2-1" "3-1" "4-1" "5-1"

When you import this file into Calc, here is what you get with the current version:

As you can see, most of the fields got converted to dates. You get the same results even if those individual cells are not quoted, because Calc’s current csv import filter doesn’t make any distinction between quoted and unquoted fields in terms of data types.

When you import this file using the new option, you get this instead:

Now, all quoted fields are imported as text, with no surprise conversion. Plain and simple. :-)

Importing Excel 2007 files

The Excel 2007 filter for Calc is still on its way, but perhaps now is a good time to show the progress of this new Excel 2007 import filter work by Daniel Rentz and myself.

Here is a screenshot of a file created by Excel 2007 (left), and one for the same file opened in Calc (right).

Excel 2007 screenshot Excel 2007 file opened in Calc

There are still a lot to be done, however. Formula import is still to be completed, which blocks other features that rely on the formula parser. Charts, text boxes, and other graphic objects are still not imported yet. There is also a performance issue of a large xlsx file import, which needs to be addressed at some point.

But all in all, things are coming along very nicely.

How to (pretend to) write an export filter

It turns out that pretending to write an export filter, at least adding a new entry to the Export dialog, is quite easy. In fact, you don’t even have to write a single line of code. Here is what to do.

Suppose you do your own build, and you have installed the OO.o that you have built. Now, go back to your build tree, and change directory into the following location

filter/source/config/fragments

and add the following two new files relative to this location:

./filters/calc_Kohei_SDF_Filter.xcu
./filters/calc_Kohei_SDF_ui.xcu

You can name your files anyway you want, of course. ;-) Anyway, put the following XML fragments into these files:

<!-- calc_Kohei_SDF_Filter.xcu -->
<node oor:name="calc_Kohei_SDF_Filter" oor:op="replace">
  <prop oor:name="Flags"><value>EXPORT ALIEN 3RDPARTYFILTER</value></prop>
  <prop oor:name="UIComponent"/>
  <prop oor:name="FilterService"><value>com.sun.star.comp.packages.KoheiSuperDuperFileExporter</value></prop>
  <prop oor:name="UserData"/>
  <prop oor:name="FileFormatVersion"/>
  <prop oor:name="Type"><value>Kohei_SDF</value></prop>
  <prop oor:name="TemplateName"/>
  <prop oor:name="DocumentService"><value>com.sun.star.sheet.SpreadsheetDocument</value></prop>
</node>
 
<!-- calc_Kohei_SDF_Filter_ui.xcu -->
<node oor:name="calc_Kohei_SDF_Filter">
  <prop oor:name="UIName"><value xml:lang="x-default">Kohei Super Duper File Format</value>
    <value xml:lang="en-US">Kohei Super Duper File Format</value>
    <value xml:lang="de">Kohei Super Duper File Format</value>
  </prop>
</node>

Likewise, create another file:

./types/Kohei_SDF.xcu

with the following content

<!-- Kohei_SDF.xcu -->
<node oor:name="Kohei_SDF" oor:op="replace" >
  <prop oor:name="DetectService"/>
  <prop oor:name="URLPattern"/>
  <prop oor:name="Extensions"><value>koheisdf</value></prop>
  <prop oor:name="MediaType"/>
  <prop oor:name="Preferred"><value>false</value></prop>
  <prop oor:name="PreferredFilter"><value>calc_Kohei_SDF_Filter</value></prop>
  <prop oor:name="UIName"><value xml:lang="x-default">Kohei Super Duper File Format</value></prop>
  <prop oor:name="ClipboardFormat"><value>doctype:Workbook</value></prop>
</node>

Once these new files are in place, add these files to fcfg_calc.mk so that the build process can find them. To add, open fcfg_calc.mk and add Kohei_SDF to the end of T4_CALC, calc_Kohei_SDF_Filter to F4_CALC, and calc_Kohei_SDF_Filter_ui to F4_UI_CALC. Save the file and rebuild the module. This should rebuild the following configuration files (build done on Linux):

./unxlngi6.pro/misc/filters/modulepacks/fcfg_calc_types.xcu
./unxlngi6.pro/misc/filters/modulepacks/fcfg_calc_filters.xcu
./unxlngi6.pro/bin/fcfg_langpack_en-US.zip

One note: the language pack zip package should contain the file named Filter.xcu with the new UI string you just put in. If you don’t see that, remove the whole unxlngi6.pro directory and build the module again.

Now it’s time to update your installation. You need to update the following files:

<install_dir>/share/registry/modules/org/openoffice/TypeDetection/Filter/fcfg_calc_filters.xcu
<install_dir>/share/registry/modules/org/openoffice/TypeDetection/Types/fcfg_calc_types.xcu

with the new ones you just rebuilt. Next, unpack the langpack zip file and extract Filter.xcu. Place this file in

<install_dir>/share/registry/res/en-US/org/openoffice/TypeDetection/Filter.xcu

to replace the old one.

Ok so far? There is one more thing you need to do to complete the process. Since these configuration files are cached, in order for the updated configuration files to take effect, the cached data must be removed. The cached data is in the user configuration directory, so you need to locate and delete the following directory:

rm -rf <user_config_dir>/user/registry/cache

That’s it! Now, fire up Calc and launch the Export dialog. You see the new file format entry you just put in. :-)

Export dialog with new export filter entry

Just try not to export your file using this new filter for real, because that will utterly fail. ;-)